Saturday, October 29, 2011

Raisin Pie for Grandpa

Hi everyone! This is Amy coming at you with a new pie this week. 
I have to say that I am SO blessed to have an amazing, supportive family in my life. My fave uncle Gary is a great source for recipes and general cooking/baking info and when he mentioned a few weeks ago that my grandfather's fave pie was raisin I knew it was the next pie I wanted to make for the blog. 

You see, I never really knew my grandparents. Gary (and my dad's) dad passed away when I was five and I have very few memories and a few photographs like this classic one: 
Yup....that would be me on the left! One of my favourite things about spending time with my aunts and uncles is hearing stories about my grandparents...it makes me feel closer to them in small ways and so did making this pie. 

Raisin pie was a total sleeper hit. What I mean is....I LOVE raisins and baked goods with raisins in them but you guys....this pie is basically ALL raisins and I wasn't sure how that would work. It worked.
It was yummy!

So starting at the beginning. I used THIS recipe for an all butter pie crust. This was actually also the first time I've attempted a lattice crust....which was kind of a hot mess but ended up looking OK and really, it's something you are going to eat and rustic is charming....right?

I found a recipe HERE for raisin pie.

  • 1 cup sugar
  • 2 1/2 tablespoons all-purpose flour
  • 1 1/2 cups cold water
  • 2 cups golden raisins
  • 1 teaspoon salt
  • 1 teaspoon ground cinnamon
  • 1 tablespoon butter 
  • 1 Pastry for double-crust pie (9 inches)

Mix sugar and flour together in a medium saucepan and stir to combine. Add water and mix, making sure to try and get out any lumps of flour. Add raisins, salt and cinnamon. Bring to boil and let boil for 2 minutes. Turn off heat and stir in 1 tbsp butter. Fill pie shell and top with lattice crust. Bake in a 375 degree oven for 45 minutes or until crust is golden and filling is set. 


I was amazed at how the filling thickened, it was really loose and watery when it went into the oven but it thickened up nicely. This pie was lovely served warm and would be AMAZING with a scoop of vanilla ice cream or a dollop of whipped cream. 


Gary, thanks for telling me about grandpa's favourite pie. I love it! 

Saturday, October 22, 2011

Peaches & Cream Tart

Peaches taste like summer to me. I think it's because the best, sweetest, peaches are fleeting. They appear at farm stands and markets, fragrant, juicy and so different in taste and texture than the peaches that get shipped to your grocery store in January. I think that this tart really highlights the peach flavor. you start by prebaking the tart shell. Personally i didn't love the crust recipe posted with the Peaches & Cream Tart recipe and if i made it again i would use this recipe that we used for the Fresh Fruit Tart

Crust:
  • 1/2 cup confectioners' sugar
  • 1 1/2 cups all-purpose flour
  • 1 1/2 sticks unsalted butter, softened and sliced
  • I mixed all of this in my food processor and pressed it into a 9" tart pan. the recipe calls for a 12" pan so I had left over crumbs. Bake in a 350 degree oven until lightly browned. This was about 10 minutes and I did this step the night before. 
  • This recipe has a great texture, it's almost like shortbread. 


Next we peeled and sliced up fresh peaches. Set these aside until the crust has cooled and you have finished the filling.  


The filling was a mixture of lemon zest, cream cheese, mascapone cheese that you ship until it's light and fluffy. Then you whip whipping cream  and fold it in. I loved the flavor of the marscapone and the whipped cream folded in gave it a nice lightness. 
You arrange the sliced peaches on the filling and glaze with some melted peach preserves. I think this glaze could benefit from a tbsp or so of lemon juice just to thin it out and brighten the flavor. 

Overall this pie was lovely, light and fresh and I would make it again for sure. 

Enjoy!


Saturday, October 8, 2011

Quick and easy meat pies!

This is Amy coming at you with this week's pie. My husband and I both work full time and go to school (we are crazy) so as a result I love a quick and easy dinner recipe and in my search for savory pie recipes I came across this one

However the only thing we took from that recipe was the idea of using rolled out biscuit dough as the crust. That was one of the things that made this recipe so quick and easy. We used these: 


Rolled out 

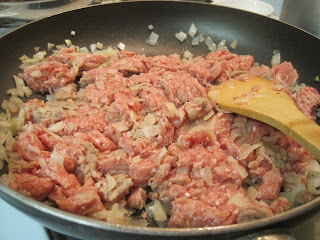
We sauteed onions and garlic and added in around 2 pounds of ground turkey (you can substitute any meat you like...a breakfast version with sausage would be yummy!

Season to taste. We used salt, pepper and some sage. Cook until your meat is cooked completely and cool slightly before moving on to the next step. You could also put this mixture in the fridge and finish the recipt the next day for a quick dinner. 

Spoon several teaspoons into the centre of the rolled out biscuits and fold them in half. Pinch the edges shut with a fork, cut several times to vent and brush with a mixture of 1 beaten egg and 1 tbsp milk.  
Bake in a 350 degree oven until golden brown (ours took about 15 minutes but keep a close eye on them. Since the filling is completely cooked before you put them in the oven you are really just cooking the biscuit. This was an easy, yummy dinner that you could adapt to fit your own family. Enjoy!

Wednesday, October 5, 2011

Blueberries & Cream Pie

This super yummy pie took several steps but was well worth it.

Step 1: Make the crust, but do not bake yet!

Step 2: Make the cream filling with :sugar, flour, eggs, sour cream & vanilla

Step 3: Pour over fresh blueberries in the pie shell

Step 4: Crumble topping...my fave part!
I LOVE crumble topped pies!
....mostly because I am lazy & hate making a top crust on my pie
but really, I love how they taste too! It's the ONLY way I'll eat apple pie.

For more details see the whole recipe here:
I don't recall diverting from this recipe at all, unless we added cardamom to the crumb topping
( I tend to put cardamom in EVERYTHING!)....well written easy to follow directions!
Lots of other great recipes on their blog too, check them out!

~Kimmy

Potato Pie

This was probably one of my favorite pies we've ever made. Love scalloped potatoes? Then you'll flip for this pie! It's basically garlic scalloped potatoes inside a yummy puff pastry shell.
(which was inspired by a Martha Stewart recipe)

First you need to peel & cut the potatoes into slices and boil them until soft.

Drain them and then make a creamy white sauce.
While the sauce thickens thaw out the puff pastry. NOTE: make sure you buy puff pastry & not Phyllo Dough. We had to make a second trip to the store because I got the wrong stuff.
Tip on thawing the dough: rub it until pliable and then open it up like in the picture below.
You should have two of these dough pieces, one of the top and one for the bottom of the pie.


Then place one layer of potatoes on the dough, topped
some green onions, butter, and swiss cheese. Repeat with the remaining potatoes, etc.
Sprinkle salt & pepper on top.

Top with the second piece of dough and crimp the edges all around. Cut two slits in the top of the pie and brush with an egg wash. Bake in the over for 35 minutes. (The other recipe said to chill it before baking, but we skipped that step and it worked just fine. Hey, we were hungry!)
WAIT! What about the white sauce we made!? After baking the pie for 35 minutes then pour the white sauce in the slits you cut in the top of the pie prior to baking. We had to use a chopstick to smash down and poke holes in the potato filling in order to get all that creamy goodness inside.


Bake 10 more minutes and enjoy!
SO SO GOOD!!!
Definitely will be making this one again very soon!!

Saturday, October 1, 2011

Ice Cream Sundae Pie

Hi everybody! 
We are back from pie-iatus and have some super great new pies to share! This Ice Cream Sundae Pie Recipe has a few different elements that give it two thumbs up from the pie girls and also the chief pie taster. 

First up was the step I started with: make your own salted caramel sauce. 
This step involved making caramel by melting sugar and letting it brown and then adding cream (be sure to use a deep pot because it splatters when you add the cream) toss in some salt for a yummy home-made caramel. This would also be really yummy on plain ice cream. 


The next step was something i really loved. A DIY chocolate cookie crumb crust that you make from scratch. Our grocery store doesn't always carry chocolate wafer cookies and this crust was a super from-scratch option. 
The third element was mixing chocolate bars to the softened ice cream of your choice. We used Bryers Natural Vanilla and it was yum! 


Top with whipped cream, drizzle with salted caramel sauce and toss in the freezer to set everything.


The end result was really yummy and it was also good the next day so if you need a 
make ahead dessert try this one!